| 1. Press
<ESC><CTRL-G> |
This disables PMS
mode |
| 2. Press <ESC> |
Main Menu appears.
Problem? Press
the reset on the Prophet-H.
|
| 3. Press <ESC><SHIFT-#>00
This sets the Prophet-H to print call
records "On the Fly" to the PC screen. |
Main Menu then a header appears showing Option
00.
Problem?
|
| 4. Make a one
minute test call and watch the SMDR LED on the Prophet-H front
panel as you hang up. |
The Yellow SMDR will flash if the PBX has
transferred the SMDR.
Problem?
|
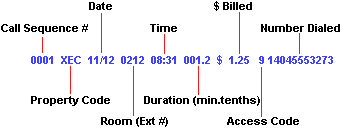
| 5. Check the
Laptop screen to see if the call record has been processed
correctly. |
Output matching the format below.
Problem?
|
If the output format is correct, configure
the system for customer use. |
| Do NOT type spaces in the commands that follow, they are placed
where a response is expected from the Prophet-H.
6. Press <ESC> R 1 080
0.01
|
Main Menu, then location 080 of rate table 1 is
changed to a value of 0.01
This places the Prophet-H in
"see-thru" mode. SMDR from the PBX will be sent directly to
the SYSTEM port without processing.
Problem?
|
| 7. Make a one
minute test call and watch the SMDR on the PC screen as you
hang up. |
Raw (unprocessed), but readable SMDR will
appear on the screen.
Problem?
|
| 8. Press
<ESC> R 1 080 0.00 |
Main Menu, then
location 080 of rate table 1 is changed back to the default
value of 0.00 turning off "see thru" mode. |
9.
Press
<ESC> R 1 081 0.01 082 0.01 083 0.01 |
Main Menu, then locations 081, 082 and 083 of
rate table 1 are changed to a value of 0.01 turning on
"accepted", "rejected" and "dropped" diagnostics mode.
NOTE: Step 8 must be
completed ("see-thru" turned OFF) for diagnostics
processing. |
| 10. Make a one
minute test call and watch the diagnostics output on the PC
screen as you hang up. |
Output simular to the format below.
Problem?
|
|

|
| 11. Once proper output is obtained, press
<ESC> 8 1 to reset the Prophet-H and then configure the
system using the Utility software or direct programming
commands.
Go to the General
Programming Reference |
A warm reset message will be
displayed.
|
 Prophet H
